

1. Drawing the Dripping Moon
Step 1
Create a New Document that measures 7" by 10.5" at 300 dpi. You can, of course, make your design any size you want, but this is the document size I used for this tutorial and my piece.

Step 2
Use the Ellipse tool (F7) to draw a circle (hold down Control in order to keep it uniform). Overlap the top right of the first circle with a smaller circle. In the Property Bar, hit Back Minus Front with both circles selected to delete the smaller circle from the larger one and form a chubby crescent moon.

Step 3
Let's work on those drips.
- Start by arranging several little circles with the Ellipse tool below the moon.
- Select a circle and Convert to Curves (Control-Q). Using the Shape tool (F10), pull the topmost node upward to form a raindrop shape.
- Repeat manipulating some of the circles. Manipulate their shapes so the drips aren't uniform.
- Make sure several of the circles and drip shapes overlap each other. Additionally, Copy (Control-C) and Paste (Control-V) a few of the circles and drips away from the larger group.

Step 4
Now it's time to finalize the drip design.
- Select the overlapping circle and drip shapes, and hit Weld in the Property Bar.
- Use the Freehand tool (F5) to draw a squiggly overlapping shape on the bottom of the moon. This allows the top edge of the compound dripping shape to be smoother.
- Once again, Weld the two shapes together. Modify and Weld additional circles and drips as needed. Group (Control-G) these drip objects together.

2. Coloring the Dripping Moon
Step 1
Select the moon with the Pick tool. In the Object Properties docker, apply a Linear Fountain Fill to the moon from magenta to purple.

Step 2
Use the Interactive Fill tool to drag the gradient within the moon object around to a position of your choosing.

Step 3
Choose a Fountain Fill for your drip group.
- To add highlights to your drips, draw raindrop-like shapes once more on several of the drip shapes.
- Adjust their Fountain Fill with the Interactive Fill tool so the lighter color is near the bottom of the highlight shape.

Step 4
Draw a large rectangle over your Page. My rectangle was slightly larger than the page in case I needed to print with bleed later. Place it behind your other objects within the Object Manager docker. Apply a Radial Fountain Fill going from navy blue to royal blue in the Object Properties docker.
Use the Interactive Fill tool to adjust the radius and position of the gradient. Lockyour rectangle object within your layer in the Object Manager docker.

3. Expanding Your Composition
Step 1
The dripping moon is the focal point of our piece. It's where everything starts in this tutorial, and it leads the eye downward to the rest of the composition. Let's give our moon some friends high above the city.
- Draw a series of overlapping circles on the left side of the moon.
- Consider the silhouette of your circles as a group. You're drawing a cloud. Is it a fluffy cloud, wispy cloud, or flat cloud? Mine's fluffy!
- Weld your circles together.
- Apply a bright blue as the fill color to your cloud in the Object Properties docker.
- Draw another cloud made of circles on the right side of the moon.
- As an optional point of design, place the drip group behind the moon.

Step 2
Because I wanted to change some of the other colors used within the rest of my composition, I used the Attributes Eyedropper to quickly and easily change the color of the objects within the drip group to match the fountain fill within the moon.

4. Converting Drop Shadows to Outer Glows
Step 1
Select the moon and use the Drop Shadow tool to drag out a small drop shadow. In the Property Bar, adjust the following:
- Set Transparency to 50.
- Set Feather to 15.
- Set the color to bright blue.
- Set the Blending Mode to Soft Light.

Step 2
Apply similarly glowing drop shadows to both of the clouds so they glow in the night sky.

5. Give Your Moon a Face
Step 1
Let's give the moon some groovy sunglasses.
- Draw a rectangle with the Rectangle tool.
- In the Property Bar, adjust the radii of your rectangle so the corners are rounded.
- For a look that's more like sunglasses, set the top left corner to 0.28", the top right corner to 0.24", the lower left to 0.38", and the lower right to 0.5". Mirror this for the right frame.
- Copy and Paste the frame to create the lens. Scale the lens down and Alignboth shapes to their centers in the Align & Distribute docker.

Step 2
Draw a smaller rectangle between both frame groups and Weld all of the frame pieces. Apply a flat fill to the frame object. Apply a Fountain Fill to both lenses that goes from magenta to yellow (make sure their angle is the same). Place the glasses on the top half of the moon.

Step 3
Group (Control-G) together your glasses objects and any additional details you've drawn. Use the Drop Shadow tool to drag out a shadow from the glasses. Set Feather to 1 in the Property Bar.

Step 4
Let's work on the mouth.
- Draw a horizontal rounded rectangle and fill it with dark plum. Set the Transparency of the object to 50.
- Draw a smaller plum rounded rectangle within the first.
- Draw a light magenta rounded rectangle behind the second rectangle and above the first. Place it slightly to the lower right of the two shapes.

Step 5
Give your moon a toothy grin!
- Draw a dark blue-gray rectangle inside the mouth. Set the lower corner radii of the rectangle to 0.30" or so.
- Draw a small triangle with the Polygon tool (Y).
- Hit Front Minus Back in the Property Bar.

Step 6
Take a moment to sit back and reflect upon how fantastic your dripping moon and cloud friends are looking at the moment. Also, you can check out the placement of each element in the image below.

6. Drawing Beautiful Flying Fish
Step 1
Let's move down the poster with some lovely flying fish.
- Using the Freehand tool, draw a long, curving raindrop shape.
- Apply a Fountain Fill to the shape that goes from yellow to magenta.
- Draw two fins at the end of the curved raindrop shape filled with the same gradient in order to create the fish's tail. Use the Interactive Fill tool to adjust the gradients of each shape so they flow into each other without Welding the shapes.
Group together all three fish components.

Step 2
Let's add some features to the fish.
- Draw a heart-like or balloon tail-like shape on the thicker end of the fish to create its mouth. Weld the fish's base body and the mouth in the Property Bar.
- Once again with the Freehand tool, draw a winking fish eye in dark plum or navy blue.
- Add dorsal fins to the fish and Weld them to the base body.
- Finally, draw some fins on the side of the body.
Optionally, you can create most of these shapes by manipulating circles that have been Converted to Curves.

Step 3
Let's create some fish scales to complete the fish design.
- Draw a tiny crescent moon as was done previously and apply a Fountain Fillof yellow at 0% to 100% Transparency.
- Copy and Paste the fish scales around the fish's body.
- Create tiny scale patterns and Group them together.

Step 4
The fins need some additional details.
- Using the Pen tool, draw thin sliver shapes on each fin.
- Draw additional shapes on the side fins.
- Continue adding thin sliver shapes to each fin. Set the fill to a Transparent Fountain Fill of dark plum at 0% to 100% Transparency.
- In the Transparency section of the Object Properties docker, set the Blending Mode to Multiply. Adjust the overall Transparency as needed.

Step 5
Group together your fish components. Copy, Paste, Scale, and Mirror the fish Horizontally for the smaller fish on the other side of the poster. Draw little blue circles for bubbles leading up to the dripping moon.

7. Create the Rainbow
Step 1
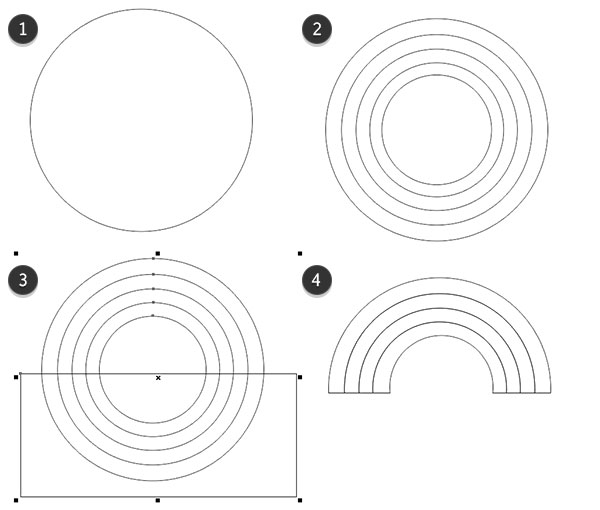
Before we draw our city, we'll need to draw a rainbow. It only makes sense.
- Draw a large circle with the Ellipse tool.
- Draw four more smaller circles within your first circle. Align them to their centers in the Align & Distribute docker.
- Overlap the lower half of the circles with a rectangle.
- Hit Simplify in the Property Bar and then delete the rectangle and inner-most half circle so you're left with four rainbow stripes.
Step 2
Let's add some color to the rainbow.
- Set the colors to the following: magenta, orange, yellow, and cyan.
- Copy and Paste all four rainbow pieces and Weld the copies together. Apply a Radial Fountain Fill in the Object Properties docker going from dark plum at 100% to 0% Transparency. Adjust the radius of the gradient with the Interactive Fill tool.
- Set the overall Transparency to 50 and the Blending Mode to Multiply.

8. Draw Your Tiny City
Step 1
It's time to draw our tiny city, which will sit at the bottom of our composition.
- Draw a vertical rectangle and set the fill color to a blue-gray.
- Draw additional rectangles of various sizes and Align their bottom edges.
- Vary their fill colors so those in the back are darker than those in front.

Step 2
Place the rainbow behind the tiny city at the bottom of your composition. Align their bottom edges.

Step 3
Copy and Paste the smaller of the clouds to the bottom of the rainbow. Copyand Paste the city group and Weld it in the Property Bar. Set the fill to a Linear Fountain Fill of dark navy blue (or your background color) at 0% to 100% Transparency. Set the angle to 90°.

Step 4
A few of our tiny buildings need windows!
- Pick a building and draw two identical rectangles on either side.
- Use the Blend tool to drag a blend between the two rectangles.
- Set the number of steps to three or so in the Property Bar.
- Copy, Paste, and Align the rectangle blend down the length of the building.
- Group the blended objects together and set the fill color to yellow. Adjust its position to right above its building in the Object Manager docker. Repeat on another building.

9. Create Musical Details
Step 1
Let's start our musical details with some lines reminiscent of sheet music.
- Use the Bezier tool to start with a straight line.
- Curve the line to the right so it pops out to the left.
- Continue the curve upward and make sure it pops out to the right.
- Copy and Paste the curved line and Rotate it so the lines are close together at the bottom and further apart at the top. Repeat a few times for four to five lines.

Step 2
Group together your musical lines and apply a Transparent Fountain Fill to the stroke in the Object Properties docker going from black at 100% Transparency to white at 0% Transparency. Place the line group behind all of the other objects in the Object Manager docker.

Step 3
Let's draw some cute little musical notes.
- Draw some small circles.
- Draw a stem and flag with the Pen tool.
- Connect the stems of Welded circles with a bar or two.
- Weld together each music note and set the fill color to bright blue.

Step 4
Scatter the music notes around the flowing lines near the fish within your composition.

10. Overlay a Custom Print for Texture
Step 1
First we'll create our pattern tiles.
- Draw a square with the Rectangle tool and another one within it Rotated to its side.
- Make sure the inner circle overlaps the outer one slightly.
- In order to see this more easily, I applied flat fills to each shape. Hit Simplify in the Property Bar.
- Change the fill color to dark gray and Scale the center square down.

Step 2
Next we'll create the pattern itself.
- Copy and Paste the pattern tile to create four evenly spaced instances.
- Go to Tools > Create > Pattern Fill. Select Vector as the Type and hit OK. Select the centers of the four squares and hit Accept in order to save your new pattern.

Step 3
Draw a large rectangle over your page.
- In the Object Properties docker, set the fill to pattern and choose your newly made pattern under the Personal heading. Resize your pattern as needed under Transformations.
- Under Transparency, set your Blend Mode to Soft Lightand overall Transparency to 34.

Step 4
For this final, optional step, we'll create simple sparkles to scatter around our design.
Draw a circle with the Ellipse tool. Using the Distort tool, select Push and Pull Distortion and set the Amplitude to 91. Set the fill color to white and scatter Copied versions of your sparkles around your poster as you see fit.

Your Poster Design Is Complete!
Mission complete! Your surreal neon poster design is ready to be placed on the walls of your favorite record shop or in a truly fantastic disco. Push your design further by adding additional features like monsters invading the city below. Share your results in the comment section below!


